Tuesday 29 July 2014

Recycling Bin with Redirected Folders

 Recycle Bins and Redirection


The Recycling Bin found on your desktop opens up a window and within that window you have all the items that you have deleted, either accidentally or deliberately.

What you might not know is that every redirected folder has its own recycling bin.  If you have 10 redirected folders you have 10 additional recycling bins, all with their own settings and storage capacities.

You also always have your local recycling bin for every drive. So if you have a C:\ and D:\ drive, you have a recycling bin for both the C:\ and D:\ Drives.

10 Redirected folders + 2 Drives = 12 individual recycling bins.

If you have redirected the music, video and pictures to follow the my documents, you have -3 recycling bins because the music, video and pictures will use the my documents recycling bin.  Just to add to that annoyance.

So when you open the recycling bin from the desktop, you are basically taking all x amount of recycling bins (in our example 12) and viewing them all in one place with no indication of which recycling bin the files exist in.

Below is an example where I have made Pictures and Music have their own redirection and "Videos" follows the Documents folder.


So even though I have one view, the files are actually stored in a completely different locations.

Locations

So lets say you map a drive the P:\ drive to the client.  This P:\ drive is their personal drive.  This drive is a unc path of: 

\\file-server-01\studentsdrives\%username%\documents. 

The Recycling Bin will be found by adding $recycle.bin to the end of that unc path.  

Following from my example above I see:


Notice now in my "Documents" recycling bin I have lost the Music and Pictures files.  This is because they reside in a different recycling bin:

  • \\file-server-01\studentsdrives\%username%\Music\$Recycle.Bin 
  • \\file-server-01\studentsdrives\%username%\Pictures\$Recycle.bin

So what does this mean for me?

You are an IT Admin and you damn well know people store stuff in their recycling bin and don't delete it.  Now if they do this, then you could have large files that are pending deletion sitting on your server as every redirected folder has their own recycling bins.

I found that a student.. copied a DVD to his "My Videos" file (3.2GB), watched the DVD and then deleted the file.  To him, the file was deleted.  To the Server, it was still there in his Recycling Bin. Even though the My Documents Recycling bin was limited in size, his My Videos Recycling bin has its own size limit and as a result he ended up with a total of 11GB of deleted files when we calculated the combined total of his recycling bin. 

That was one student.. . In high schools with over 1k in student numbers, this is a massive drain on server resources, naturally it justifies the nice new SAN system you want, but schools don't have much money anymore, they never did to begin with and it is just getting worse. 

So how to I manage it?

Well this is the tricky bit now, because there is no pre-set GPO to deal with this.

The easiest way is to use File/Folder Quota Management.  Each recycling bin is set to use a percentage of the allocated size of the allowed disk, but this depends on your folder structures and redirection as you can say your personal folders are only allowed 10GB but your profile folders might be in a different location and you need to then set quotas for those as well. 

Customized GPO


I took the liberty to create a GPO that will enable you to disable and/or specify sizes for each individual redirected folder recycling bin.  

I have tested this with Windows 7 and have confirmed the settings for higher versions.


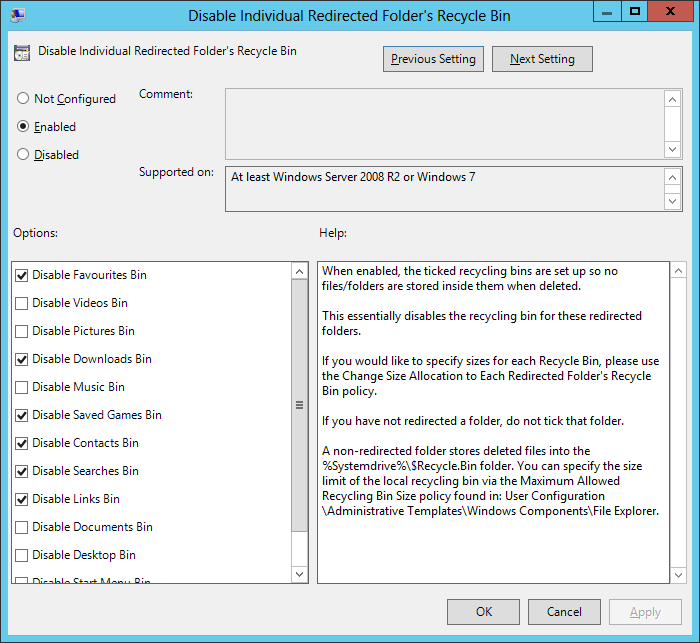
You can completely disable the redirected folder recycling bin (above)


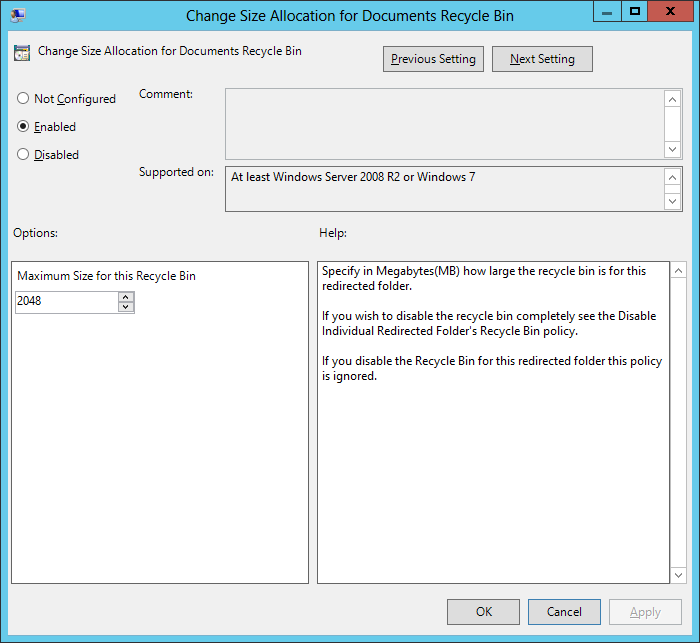
Or you can specify the size of each redirected folder's recycle bin.


If you right click on your recycling bin on your client computer,  you will find where these settings will apply:


For each recycling bin you either set it so it doesn't move the files to the recycling bin and just deletes them with immediate effect or alternatively you can set the size in MB within the policy. 

For example, I have had my Pictures, Videos and Music to follow the documents folder, I have set, using my GP Objects to limit the documents recycle bin to 3GB and have disabled every other recycling bin.

If they deleted an item from their downloads folder by accident, I can recover it anyway using shadow copy. 

This is how I solved it and if anyone else if having these issues, buy all means try my policies.  The alternative way is to manually alter the registry for each redirected folder, but that made up about 12 preferences which I could do without. Looks messy. 

Hope this helps some out there. 

Regards, 

Wednesday 16 July 2014

Assigning Office 365 options to users (Basic)


I have recently been working with a school who have signed up to Microsoft’s OVS-ES service, as a part of this they are entitled to apply for Student Advantage licenses which will allow pupils to download and install an up to date version of Office on up to 5 devices at home. In order to access this feature the school need to sign up for an Office 365 account and to use the A2 (Free) service.
Administrators can apply licenses to staff and pupils through a website, however this only allows you to modify a limited number of users at a time but Microsoft have been generous and provided a means of automating some of these processes using PowerShell.
In order to accomplish this you will require the Windows Azure Components installed on your computer, once these are installed you will be able to use PowerShell to connect and work with your Office 365 service.
The script below is an example of PowerShell code which will allow you to apply a license to users within a certain department (AD Attribute), once this license has been applied any restrictions you wish on the services within the license are added.
This script could be amended to work with Pupil users by editing the License used and the Department searched for, however the script is very basic and will not take into account any users who may have conflicting entries to those you set, I have not tested this scenario.
I will follow up on this basic post with a more comprehensive one which will allow you to pick the department and license you wish to apply based on basic text menu’s presented in the shell but for now this will give you something to be going on with.
1 ################################################################################### 2 # Marc Hundley 3 # 4 # Version 0.1 5 # 6 # 16/07/2014 7 # 8 # Purpose : Allocating with restrictions access for Staff to the O365 tools online 9 ################################################################################### 10 #11 # Requirements 12 # ------------ 13 #14 # Windows Azure Components 15 # Office 365 online account 16 #17 ###### 18 #19 # Suitable amount of licenses to allocate to staff 20 #21 ###### 22 #23 # Knowledge of TENANT_ID - can be obtained by using the following commands : 24 #25 # import-module MSOnline 26 # $msolcred = Get-Credential 27 # Connect-MsolService -Credential $msolcred 28 # $licenses = Get-MsolAccountSku 29 # $licenses 30 #31 # This will give you all of the available licenses, the TENANT_ID will be the 32 # common factor before the : 33 #34 ###### 35 #36 # Edit the -DisabledPlans entry depending on the needs of the customer, these 37 # can be obtained with the command : 38 #39 # import-module MSOnline 40 # $msolcred = Get-Credential 41 # Connect-MsolService -Credential $msolcred 42 # $licenses = Get-MsolAccountSku 43 # $licenses[x].ServiceStatus 44 #45 # Where [x] is the license you wish to view (array starting at 0) 46 #47 # Options for the STANDARDWOFFPACK_FACULTY are as follows 48 #49 # YAMMER_EDU 50 # SHAREPOINTWAC_EDU 51 # MCOSTANDARD 52 # SHAREPOINTSTANDARD_EDU 53 # EXCHANGE_S_STANDARD 54 #55 ###### 56 #57 # Staff members are to be members of the Staff department in Active Directory 58 # which has synchronised with Office 365 59 #60 ################################################################################### 61 62 #Import O365 Azure module 63 import-module MSOnline64 #Clear Screen 65 cls66 67 #Connect to Office 365 with admin credentials 68 $msolcred = Get-Credential69 Connect-MsolService -Credential $msolcred 70 71 #get users 72 $users = Get-MsolUser -Department "Staff" -MaxResults 2500 73 74 #Assign faculty pack exclusions to variable (edit disabledplans as needed by customer) 75 $myO365Sku = New-MsolLicenseOptions -AccountSkuId <TENANT_ID>:STANDARDWOFFPACK_FACULTY -DisabledPlans EXCHANGE_S_STANDARD76 77 #Assign components for each user 78 foreach ($user in $users) {79 $username = $user.UserPrincipalName80 write-Host "Assigning License for "$username 81 #Add Overall license (required before setting restrictions) 82 Set-MsolUserLicense -UserPrincipalName $username -AddLicenses <TENANT_ID>:STANDARDWOFFPACK_FACULTY83 #Assign exclusions 84 Set-MsolUserLicense -UserPrincipalName $username -LicenseOptions $myO365Sku 85 }

Tuesday 15 July 2014

Unable to use Keyboard with VMware Player or vSphere

Been a while since I've posted, but this one I've wasted a day or two trying to resolve and couldn't find any information anywhere.

Issue: VMWare vSphere or Workstation accepting mouse input, but not keyboard input.

Cause: Windows update KB2973201 - A security update for tablet features, unnecessary for most users.

Workaround: Uninstall the update. Hide in windows updates to prevent reinstalling.

Fix: TBA

Thursday 3 July 2014

Change Default Printer Settings from 2 sided to 1 sided on 10.9

Annoyingly when you add certain drivers to a Mac, the default may say 1-sided but the pages still print as 2-sided. This can cause much frustration and although you can create presets, there is no way to actually change the default through those settings. However by following these few steps you can change the default settings. Please bear in mind, this only changes the default on the computer you are working on. If you have a Mac Server where the printer sits, then run these steps on that and it should set it all as default:

Annoyingly again on 10.9, access to the CUPS page is blocked, it is almost like Apple don't want to change anything these days. To enable it, open Terminal (Go to spotlight and search for it) and type "sudo cupsctl WebInterface=yes" (without the quotation marks). You will need to enter the admin password when prompted.

Open a browser and in the address bar enter “localhost:631”


With the CUPS web page open, select the Printers tab and the printer you want to edit. In this case I select the Konica.


Then on the drop down menu titled “Administration” , change to "Set Default Options".


This will show a new page with some new headings (links).


In this case select Finishing Options. Scroll down the list until you see Print type. Change it from 2 Sided to 1 Sided.


Then scroll down the page until you see the Set Default Options button.


Click on this button to save the change. You will then be prompted to authenticate to CUPS.


Enter the account name and password of the Mac user, it needs to be an admin account. And then press the Log In button. You should then get a confirmation.