Friday, 19 August 2011

Dell Optiplex 390 fails to apply GPO settings


At work we have been deploying Dell Optiplex 390’s with XP using an MDT task sequence, the build works perfectly however once the machine attempts to apply group policy we have failures, this causes the machine to fail to install allocated msi packages. Obviously not a great situation to be in.
Following some research I have found that the issue appears to occur mostly in situations where a client is using a Gig speed network card and where network connections are teamed. The issue appears to be caused by the network card switching between speeds and full/half duplex to find the mode it can operate at. By adding a registry key we can prevent this checking from happening which will provide a more stable connection during the all important startup process.
This solution has been tested to work in our environment, obviously your mileage may vary and if you choose to make this change you do so at your own risk, playing with the networking settings in Windows may break more than it fixes however in our testing this has been an easy and successful workaround.

The key details are as follows
Key Location : HKLM\System\CurrentControlSet\Services\Tcpip\Parameters
Key Name : DisableDHCPMediaSense
Key Type : Reg_Dword
Key Value : 00000001

These settings can either be added using a reg entry or a command line as follows
reg add HKLM\System\CurrentControlSet\Services\Tcpip\Parameters /v DisableDHCPMediaSense /t REG_Dword /d 00000001

In our case we have added a command line near the end of our task sequence which we have filtered using WMI in a way similar to the one we used in a previous post. In this case the WMI filter we used is as follows


Select * from Win32_ComputerSystemProduct WHERE Name LIKE "%Optiplex 390%"

Again we are running this against the root\cimv2 namespace. This query could be repeated in the task sequence options filtering for additional hardware which exhibits this particular issue, thereby allowing you to keep a smaller number of task sequences in your deployment share.

Update : 29-06-2012

We have begun rolling out Samsung N200 laptops, these also exhibit the issue with needing DHCPMediaSense to be set, for ease of use here is the WMI code needed

Select * from Win32_ComputerSystemProduct WHERE Name LIKE "300V3A/300V4A/300V5A/200A4B/200A5B"

Reference:

Technet User Discussion

Serverfault Question
Dell Laptop freefall sensor driver kills MDT Win XP


We have been building a large number of Dell Latitude E5410 and E5420 laptops using an MDT task sequence to install Win XP. The task sequence does not use a wim file for xp but is effectively the same as running a RIS style setup process.

We downloaded the driver pack which Dell make available for the E5420, in theory this contains all drivers needed in a single cab file, however we encountered an issue in that during setup the installation WMI either got corrupted or failed to install. Since MDT needs to use WMI in order to run this left us with a partly installed XP machine which fails to complete the task sequence. This issue did not present itself when we ran a test build with Windows 7.

As part of our troubleshooting we manually downloaded the drivers individually and added them to MDT, we missed the ST Microelectronics Freefall sensor as it was wrapped up in an installshield exe file but the task sequence completed succesfully. Helpfully Dell included a readme with the exe file which explained that we could run the setup.exe with the /s switch and this would allow a silent install with no reboot when done.

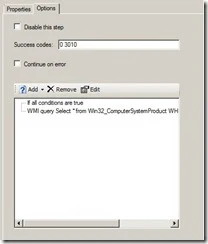
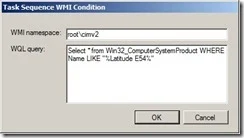
Using this information we imported the setup file into the MDT Deploymentshare as an application then added it near the end of the task sequence. In order to not need an extra task sequence just for the laptops we edited the options for the application installation step and added the filtering options to only apply if true and used a WMI query to test for the model type. The WMI query used is as follows

WMI Namespace : root\cimv2

WQL Query : Select * from Win32_ComputerSystemProduct WHERE Name LIKE "%Latitude E54%"


WMI query
Query entry dialog box

WMI query2
Completed query entry in task sequence options.


Using these settings will allow the installation of Windows to complete leaving you with a fully working WMI installation and all of the drivers to give you a nice clean Device Manager.

Friday, 27 May 2011

Deploying Drivers

Have you ever just finished building a load of PCs, to have someone come up and ask for some dodgy piece of hardware to be installed on all PCs, and the drivers required are unsigned, and aren't pre-packaged in an easily deployable silent package or MSI. Or you've been given some dodgy new hardware (you know the companies I'm talking of), to install.

Well its easier than you think to deploy drivers as either a script or as part of an MSI package. I am assuming that you, the reader, are capable of writing a script and/or creating a suitable MSI, so I will not insult your intelligence by giving you a completed script/msi. If you're anything like me (God help you if you are!) you'll learn better by doing, rather than seeing.

Anyway, by using a small executable provide by Microsoft, DPInst.exe, available as part of the Windows Driver Kit (WDK), Download available here, we can indeed make drivers available on any windows OS system, to be installed as and when needed.

Once you have download and installed the WDK (btw you only need to install the tools part), you can find different architectural/language versions of the DPInst.exe in C:\WinDDK\7600.16385.1\redist\DIFx\dpinst (assuming you install to the default location, and the version number hasn’t changed since writing).

Place the correct version of DPInst.exe in with your driver .inf files. If you were to run the dpinst.exe now, you would be presented with a wizard for installing the drivers onto the system. If you were to step through the wizard, it will complete, but it will only be successfully if the drivers are signed.

However, that’s not what we really want, we need no user interaction at all, and we need to be able to install unsigned driver*. To install any drivers without the end user noticing, call the DPInst.exe with the following commands:

/Q  - This is for quiet install with no user interaction,
/LM – This is for unsigned drivers.

Now the drivers are installed, or technically they are made available to be installed when the hardware is connected. Now if your drivers are signed that is the end of the story, however, if like me, you have been given a host of cheap hardware made in china, with unsigned drivers, you will need to adjust the following 2 Group Policies*:

Computer Configuration>Windows Settings>security Settings>Local Policies>User Rights Assignment:
Policy: “Load and unload device drivers”
Setting: DomainName\Domain Users

User Configuration>Admin Templates>System>Driver Installation:
Policy: “Code signing for device drivers”
Setting: Enabled – ignore

Click here for a full overview of DPInst, and here for a full list of command switches.

* Please note that installing unsigned drivers and/or modifying Group Policy is done at the readers own risk, and the writers of “Thoughts of a Primary School Tech” are in no way responsible/liable for any loss/damage caused to any system(s) by following the instructions provided here. Whilst every effort has been made to ensure this works correctly on any windows system, your milage may vary.

Tuesday, 24 May 2011

Adobe Reader 10 cannot open pdf from UNC path

If you have deployed Adobe Reader 10 and get messages saying that your users cannot open .pdf files from a network location the likely culprit is that protected mode is enabled.
You can turn this mode off using a registry edit as below:

Registry Editing Method
Open notepad and paste the following command, when pasted save as a .reg file.

REG ADD "HKCU\SOFTWARE\Adobe\Acrobat Reader\10.0\Privileged" /v bProtectedMode /t REG_DWORD /d 0 /f
 
Alternative Method
If using Server 2008R2 you can set a preference to make a change to the registry for users as below
Open Group Policy Management from Start > Administrative Tools > Group Policy Management


Create a new Group Policy Object


Give the GPO a suitable name
 

Right click and select edit

 
Expand the User Preferences menu option

 
Expand the Windows Settings and select Registry

 
In the blank area in the right hand pane right click and select New > Registry Item

 
Ensure that the settings are to ‘Update’ the registry key, also check that the selected hive is HKEY_CURRENT_USER.
In the Key path enter ‘SOFTWARE\Adobe\Acrobat Reader\10.0\Privileged’

 
Enter ‘bProtectedMode’ into the Value box

 
Change the value type to REG_DWORD


In the value box enter ‘0’

 
Click OK and you are done.
 

This is how the finished registry entry should look.

Tuesday, 17 May 2011

Older Smart Boards with Windows 7 x64


Some Smart boards back in the day came didn't want to be that easy and decided to use a "USB-Serial Controller" device to connect to your computer. Now in Windows XP 32bit this came within the standard Smart Drivers you can easily download from SmartTech, but unfortunately with a 64bit operating systems, especially Windows 7, this device commonly is not found within this driver pack and needs to be sourced via a third party.

Luckily with help from a blog from Visible Procrastinations there is a easy solution to this.


Installing a fresh copy of SMART Notebook 10 doesn’t load the drivers for this adapter, and Windows ‘yellow triangles’ the device as an unknown ‘USB-Serial controller’. Reading the technical bulletin, we should be able to install the driver from the original SMART Board ie. D:\STI2303X.inf – unfortunately this is not the case.

Having a look at the properties of STI2303X.sys which is the driver that should be being loaded we find;

* Original File name: USB2SER.SYS
* Product Name: PL-2303 OnlyUSB Link Cable

A quick search on Google and we can acquire drivers from the Prolific support site.;

PL-2303 USB to Serial Bridge (H, HX, X) Installshield Driver Setup Program
Installer version & Build date: 1.3.0 (2010-7-15)
Windows 98/ME Driver: v2.0.0.19
Windows 2000/XP/Server2003 (32 & 64-bit) WDM WHQL Driver: v2.0.13.130
Windows Vista/7/Server2008 (32 & 64-bit) WDF WHQL Driver: v3.3.11.152
Language Support: English (default), Chinese (Traditional), Chinese (Simplified), Japanese
For Prolific USB VID_067B&PID_2303 Only

Now in device manager, right click your problem driver and manually source the inf file from the following directory.

C:\Program Files (x86)\SMART Technologies\SMART Product Drivers\PNP Drivers\HidBoard.inf

And we have a working SMART Board.

Update: Recently I have discovered that the 10.8 version of this software is slightly different in where it stores its drivers. If this solution does not work, try to use the drivers included within the orginal install that are hidden in "C:\program files (x86)\SMART Technologies\Drivers\x64" (or x86 if you're on a 32bit machine). It was just by pure luck I found this worked.

Friday, 13 May 2011

Group Policy Setting - Verbose vs normal status messages

During a major roll out of software using Group Policy on a Windows 7 Client System, I had cause to want to know what was happening during the roll out, to see if any software was sticking. To enable more detailed messages on screen (other than "Please Wait") enable the following in an appropriate GPO:

Computer > Policies > Administrative Templates > System > Verbose vs normal status message

This setting displays a number of extra status messages during the start up and shutdown of the computer and when the user is logging on and off. Some of the verbose status messages you will see are (but not limited to):

Software Deployment
Mapping Drives
Playing Logon Sound
Mapping Printers
Applying Power Settings
Stopping Services


You will still see your Applying Computer settings and Preparing Desktop messages however these will be shown for a lot shorter time.

Also by enabling this option end users think that their PC is faster, due the reduced time each message is displayed. It certainly seems to speed it up for me anyway. This is still a handy setting to enable as at the very least will help your IT support troubleshoot log on performance issues.

This setting will work on Windows 2000 and above and it will also show the processing of newer Group Policy Preferences.

Original Source:
http://www.grouppolicy.biz/2009/11/group-policy-setting-of-the-week-2-verbose-vs-normal-status-messages/

Friday, 6 May 2011

Removing Items from Navigation Pane.

The other week I happened to be testing the pupil lockdown of Windows 7, and realised that users could access things in the navigation bar that I didn't want them to access. Things like computers on the network, favourites (not IE favourites), Homegroup (which is empty, so is pointless being there) and Libraries.


No problem I thought, it must be a Group Policy I've overlooked...Nope. It seems that microsoft don't want Network administrators to be able to remove these from the end users. Not easily anyway. So I turn to my tried and trusted friend, Bing (You were expecting Google, right?), and found the answers. I provide a quick explaination here, mainly for my own benefit, and the original source is linked at the bottom, there you will also find a way of removing computer from the Navigation Pane, and the pane itself if you wish to go down that route.

To modify items in the navigation pane, you must first give administrator full control to the following registry keys:

For x32 and x64 Systems.
Favourites: HKEY_CLASSES_ROOT\CLSID\{323CA680-C24D-4099-B94D-446DD2D7249E}\ShellFolder
Libraries: HKEY_CLASSES_ROOT\CLSID\{031E4825-7B94-4dc3-B131-E946B44C8DD5}\ShellFolder
Homegroup: HKEY_CLASSES_ROOT\CLSID\{B4FB3F98-C1EA-428d-A78A-D1F5659CBA93}\ShellFolder
Network: HKEY_CLASSES_ROOT\CLSID\{F02C1A0D-BE21-4350-88B0-7367FC96EF3C}\ShellFolder

Additional for x64 Systems Only.
Favourites: HKEY_LOCAL_MACHINE\SOFTWARE\Wow6432Node\Classes\CLSID\{323CA680-C24D-4099-B94D-446DD2D7249E}\ShellFolder
Libraries: HKEY_LOCAL_MACHINE\SOFTWARE\Wow6432Node\Classes\CLSID\{031E4825-7B94-4dc3-B131-E946B44C8DD5}\ShellFolder
Homegroup: HKEY_LOCAL_MACHINE\SOFTWARE\Wow6432Node\Classes\CLSID\{B4FB3F98-C1EA-428d-A78A-D1F5659CBA93}\ShellFolder
Network: HKEY_LOCAL_MACHINE\SOFTWARE\Wow6432Node\Classes\CLSID\{F02C1A0D-BE21-4350-88B0-7367FC96EF3C}\ShellFolder

Theoretically administrator accounts should already have full control to these keys, but I found that without doing the above, the items were not modified. It may also turn out that you do not need to add the first set of registry keys for a x64 system, but I have not tested that yet, if I ever get around to it I will update this post accordingly.

Now for adding/removing the items. Please modify the Attribute Values below the above keys as required below:

Favourites On: a0900100 (Default Setting)
Favourites Off: a9400100
Libraries On: b080010d (Default Setting)
Libraries Off: b090010d
Homegroup On: b084010c (Default Setting)
Homegroup Off: b94010c
Network On: b0040064 (Default Setting)
Network Off: b0940064

I made the necessary modifications using a combination of Group Policy (for the registry permissions) and Preferences (for modifying the value), but feel free to make the changes how you feel most comfortable.

The original information found at:
http://www.sevenforums.com/tutorials/38933-favorites-add-remove-navigation-pane.html
http://www.sevenforums.com/tutorials/35627-libraries-folder-add-remove-navigation-pane.html
http://www.sevenforums.com/tutorials/39670-homegroup-add-remove-navigation-pane.html
http://www.sevenforums.com/tutorials/39699-network-add-remove-navigation-pane.html

Saturday, 16 April 2011

Unresponsive Flash player applications

If you are using flash based software which becomes unresponsive to clicks, this may be due to Flash player not trusting the file or path you are accessing. To work around this problem you may require a config file to allow flash to trust a file location. In order to open things up ensure you have a folder called 'FlashPlayerTrust' in the following path.

'C:\Windows\system32\Macromed\Flash\
'

Within this folder create a file with the .cfg extension, inside this file you will require the path of the folder you wish to trust, you can put multiple paths in this file, one on each line

e.g.

C:\Path\to\application\1
C:\Path\2
C:\Any\Other\Path

Just to make sure, give the machine a restart and you should find the application now works as expected.

Friday, 8 April 2011

Installing Sims via a script

If the need arises to install Sims onto a large quantity of workstations and Solus 3 is not an option you can use the following script, the only changes needed are to ensure that the connect.ini and sims.ini files are located in the root of S: and to edit the second line of the script to match your own situation.


@echo off
net use S: \\SIMSSERVER\SIMS-SHARE password /user:DOMAIN\Username

S:\SIMS\Setups\simsinfrastructuresetup.exe -a {QuietMode} {SIMSWorkstation} {FMSWorkstation}
S:\SIMS\Setups\simsapplicationSetup.exe /S {QuietMode} [SIMSDirectory="S:\SIMS" [SIMSDotNetDirectory]="C:\Program Files\SIMS\SIMS .net"
S:\SIMS\Setups\simsmanualSetup.exe /S {QuietMode} [SIMSDirectory]="S:\SIMS" [SIMSDotNetDirectory]="C:\Program Files\SIMS\SIMS .net"
S:\SIMS\Setups\simsamparkSetup.exe /S {QuietMode} [SIMSDirectory]="S:\SIMS" [SIMSDotNetDirectory]="C:\Program Files\SIMS\SIMS .net"
XCopy S:\connect.ini "C:\Program Files\SIMS\Sims .net" /y
XCopy S:\SIMS.ini "C:\Windows" /y
net use s: /d

Thursday, 7 April 2011

WMI Filters for different Windows versions

In order to run multiple operating systems in the same OU structure  and have relevant GPO's applied we can make use of WMI filters. These filters can be used to interrogate the operating system and either apply or not based on the result.

I will not go into how to create a WMI filter here as if you are here looking at this then you only really want the query needed to create the filter.

The basic filter will take the following format

Select * from Win32_OperatingSystem Where Version like “x” and ProductType = “y" 

OS Version

The relevant  OS version values are as follows, these can be substituted in place of x:

Windows 7 or Server 2008 R2 = “6.1%”
Windows Vista or Server 2008 = “6.0%”
Windows XP = “5.2%”
Windows 2000 = “5.0%”

Product Type

 To filter by roles the computer may perform, change the ProductType (y) to:

Client = “1”
Server running a Domain Controller role = “2”
Member server (server that’s not a DC) = “3”

Tuesday, 5 April 2011

Modifying Deploymentmonitor.hta

In a previous post I mentioned a utility from the Microsoft Deployment Guys which allows you to monitor how your Litetouch build is progressing. In this post I am going to show how you can modify the utility to make it a little more appropriate to your own needs.


The utility itself is a HTA file which can be edited in a text editor, my editor or preference is notepad++ as it supports several different languages and will indent and colour code languages it understands as necessary to make things easier to follow.


Onto the file itself:


Lets start early on at line 7


MINIMIZEBUTTON="NO"


for some reason the Deployment guys didn't feel the need to minimize the app to the taskbar, however in the world of education we are often doing at least three things at once and to keep the screen as uncluttered as possible you can edit the line to


MINIMIZEBUTTON="YES"


and instantly you have the option to put things out of the way.


If you are using this in a fixed location you may want to prepopulate the location for the script to check for log files, this can be done by editing line 278 from

<input id="lblEventShare" type="text" name="lblEventShare" />&nbsp;&nbsp;&nbsp;&nbsp;

to

<input id="lblEventShare" type="text" name="lblEventShare" value="\\servername\Share$" />&nbsp;&nbsp;&nbsp;&nbsp;


To automatically check the autorefresh box when starting the app change line 292 from


<input id="chkAutoRefresh" name="chkAutoRefresh"type="checkbox" />

to


<input id="chkAutoRefresh" name="chkAutoRefresh"type="checkbox" checked/>

You will still need to click the refresh button once to start the process.


To change the frequency that the app automatically checks for updates edit line 203


iTimerID = window.setInterval("Refresh", 120000)

You will also want to edit line 292 to reflect the changed time you have set.


&nbsp;Auto-refresh every 2 minutes (press &#39;Refresh Display&#39; to start)every 2 minutes (press &#39;Refresh Display&#39; to start)


Hopefully these changes will make this great utility more useful in your deployment efforts.

Import drivers into MDT maintaining folder structure

I recently got an email from Johan Arwidmark's mailing list at Truesec, this mail contained a powershell script to import drivers into MDT whilst maintaining the folder structure, this will allow multiple driver imports for a range of hardware without dumping all of the drivers in on huge lump in the 'Out Of Box Drivers' folder.


The Drivers folder layout will follow the format as follows

Drivers\
     |------OS 1\
     |          |--------->Manufacturer1\
     |          |                   |----------->Model1\
     |          |                   |----------->Model2\
     |          |--------->Manufacturer2\
     |                              |----------->Model1\
     |                              |----------->Model2\
     |------OS 2\
                |--------->Manufacturer1\
                |                   |----------->Model1\
                |                   |----------->Model2\
                |--------->Manufacturer2\
                                   |----------->Model1\
                                   |----------->Model2\


You will need to edit the first three lines of this script to match your environment, otherwise it should be good to go.


$DriverStore = "C:\Drivers"
$MDTDSRoot = "C:\MDTBuildLab"
$PSDriveName = "DS001"

Add-PSSnapIn Microsoft.BDD.PSSnapIn
New-PSDrive -Name "$PSDriveName" -PSProvider MDTProvider -Root $MDTDSRoot
# Proces each of the operating systems folders
Get-ChildItem "$DriverStore" | foreach {

    # Display the folder we are processing
    Write-Host "Processing $($_.FullName)" -ForeGroundColor green;Write-Host ""

    # Create the operating system folder in the MDT 2010 Deployment Workbench
    new-item -path $PSDriveName":\Out-of-Box Drivers" -enable "True" -Name "$($_.Name)" -ItemType "folder" -Verbose

    # Process each of the vendor folders
    $OSFolder = $_
    Get-ChildItem $_.FullName | foreach {
       
        # Display the folder we are processing
        Write-Host "Processing $($_.FullName)" -ForeGroundColor green;Write-Host "" 

        # Create the vendor folder in the MDT 2010 Deployment Workbench
        new-item -path $PSDriveName":\Out-of-Box Drivers\$OSFolder" -enable "True" -Name "$($_.Name)" -ItemType "folder" -Verbose
       
       # Process each of the model folders
       $VendorFolder = $_
       Get-ChildItem $_.FullName | foreach {

            # Display the folder we are processing
            Write-Host "";Write-Host "Processing $($_.FullName)" -ForeGroundColor green;Write-Host "" 
   
           # Create the model folder in the MDT 2010 Deployment Workbench
           new-item -path $PSDriveName":\Out-of-Box Drivers\$OSFolder\$VendorFolder" -enable "True" -Name "$($_.Name)" -ItemType "folder" -Verbose

           # Import the drivers into MDT 2010 Deployment Workbench
           Import-MDTDriver -Path $PSDriveName":\Out-of-Box Drivers\$OSFolder\$VendorFolder\$($_.Name)" -SourcePath "$($_.FullName)" -Verbose
          }
    } 
}

During testing of this script I encountered errors while creating folders, this error appears to be down to the code using  '-enable "True"' powershell spits this out with some ugly red lettering, I have found that by removing this part of the code the script appears to run perfectly and populate MDT as we hope.

Friday, 1 April 2011

Monitoring MDT Litetouch task sequence

When using MDT to deploy machines in school, we currently have the system set so that we enter a computer name and pick an image type then everything else is automatic, we have the machines put into the computers container in AD, this is due to the fact that we have not set MDT to automatically name and place machines yet.

If the need to rebuild a machine arises we will start off the process and leave the machine running, the task sequence will lock the workstation wherever necessary due to the system being logged on as an admin account, however the difficulty lies in knowing when the build has completed and being able to move the computer to its correct OU.

If we move the machine too soon then other scripts will run which may affect the task sequence such as the installation of antivirus which may quarantine needed files. If we fail to move the machine then it will be built and on the domain but will have no curriculum software,

MDT has a useful feature which can write log files as each stage of the task sequence is completed, using this you can monitor how far along a machine is.

To set this up:

  1. Create a share on a server, you can use either an open or hidden share.
  2. Edit the Default section in your deployment share customsettings.ini to include the following line.

    EventShare=\\Servername_or_IP\Sharename$

  3. Update your deployment share.

Any new builds you start will write log files to the shared folder, initially the log will have a MININT name but as soon as the computer is given a correct name the logs will use this.


To make it easier to monitor what is going on in these logs the Deployment guys have written a utility to display the current info in an easier to read format, this can be downloaded from the original post.

Essentially the utility is a HTA which will monitor a given folder which you set, the optional refresh period of two minutes will allow you to keep a background eye on the build process.

To use the utility, download and extract the zip file from their page to a relevant location, double click on the DeploymentMonitor.hta file. Enter the path to the share you created and click refresh. The utility will return the contents of the folder, if you wish to have the utility update every two minutes tick the checkbox and then click refresh.


This utility will not clear out the folder so you will need to perform some housekeeping from time to time depending on how many builds you perform as the folder will gradually fill up with old info.


Disclaimer::
As with all of the Deployment/Scripting Guys utils they are provided with no warranties or guarantees of any kind, their use is entirely at your own risk.

Saturday, 26 March 2011

sparkeh blog: Making Installshield deployments silent

Whilst trawling through edugeek.net this morning I found this post which could be useful for anyone who wants to make an Installshield installation silent. Although I already knew about the /s switch using /r was new to me. Hopefully he will continue to post new information that I don't have the time to find out for myself.

sparkeh blog: Making Installshield deployments silent


I have posted the text below as found on the site:


"Every so often I come across something that I am astounded that I don't already know. This might be a lot of old chips to you but whilst looking for tips on deploying Installshield installers I stumbled across guidance on making the deployment silent.
As you probably know, Installershield deployments usually come as a setup.exe file. This is not always the case but then you can usually grab the setup.exe and other setup files (cab file for example) from a temp folder when you launch the installer.
If you want to make the installation silent you need to use the /s switch, however the installer will look for and answer file called setup.iss. If you are luck then your software vendor will have provided one. Not very often though in my experience.
The good news though, is that you can create one yourself by running the installation with the record switch /r. This dumps a setup.iss file in c:\windows. Move this to the same directory as the installer and you can run the installation silently (with /s) with all the options you chose in the recorded run through. Well almost ;)

There is one sting in the tale to be aware of though. Due to a forked process starting up and completing before the installation is complete, you need to add another switch (/sms) to force the process to wait until the installation is complete.
So in summary, once you have a installer with its setup.iss in place you can run 'setup.exe /s /sms'."

Thursday, 24 March 2011

Windows 7 Godmode

I thought I'd better introduce myself, I'm The IT Nut, a colleague of the Primary School Tech, and I will be dropping a few posts on here from time to time.

I'll be specialising in Powershell Tips and creating MSI packages for group policy rollout, along with links to a few projects of my own.

To start with though, I thought I begin with GodMode! I found out about this feature and thought it was rather neat.
GodMode is a hidden feature in Windows 7 as well as windows vista. By enabling this feature allows you to access all windows settings in a single place. It is a single folder that collects all of the control panel functions,interface customization,accessibility options etc..

Steps:
•Create a new folder
•Name the folder: GodMode.{ED7BA470-8E54-465E-825C-99712043E01C}
•Then open it to show the GodMode window.

GodMode enabled.

Friday, 11 March 2011

Resetting Tandberg TS800 LTO3 drive

Recently I was met with a Tandberg TS800 (820LTO) drive which had a flashing fault LED, after some searching I found the following procedure to work

Ensure that the Fault LED is flashing amber and that the Activity LED is off.


1. Press the Eject button for at least 6 seconds so that the Ready LED is flashing (Service Mode)
2. Press the Eject button once more (Activity LED Flashing)
3. Press the Eject button twice to reset the drive (You will hear the drive resetting)
3. Press Eject once more to exit service mode


If the button is not pushed for 15 seconds, the eject button reverts back to its original cartridge eject function.

Using GParted to repair NTFS partition size

While using P.I.N.G. to make a backup of a machine I chose to shrink the partition before taking an image, this was necessary as I did not have either the space or time to wait for a 320Gb image to be created over a network connection.

P.I.N.G. uses the linux utility ntfsresize to work out how small the partition can be, resizes the partition then takes an image of it. Unfortunately in this instance when finished it did not resize the partition back to full size (I am unsure if it should by default)

This left me with the situation that Windows XP thought it had a 320Gb hard drive with an 11Gb partition, being unable to save any further data to the disk meant that windows was an unhappy bunny.


In theory I could use ntfsresize from the command line to expand the partition to fill the hard drive again, however when I tried this I was getting various error messages about not being able to access the drive.

Step in GParted and the ever useful Ubuntu bootable USB Stick, simply boot into the Ubuntu system, right click the disk you need to work on and select "Resize/Move" simply reduce the size by 1 meg and click apply, then click the green tick to apply the settings, close out of GParted and rebooth the machine back into windows, you should find that the partition is correctly showing as the full size minus 1 meg.