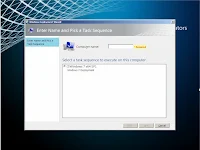
At work we are still deploying Windows XP due to a need for our customers, we have automated the installation to a large extent however the biggest bugbear we have had is the need to select a task sequence and then to click next before giving the computer a name.
Here you can see where we are going from and to
Here is the original Task Sequence selection screen
Followed by the Name your computer screen
We are aware that by prestaging machines we could avoid this issue however for our needs this would be overkill and an additional time overhead, what we wanted was the ability to unbox and name machines then walk away.
While poking around I found that the wizard you navigate around when using the Lite Touch Deployment is controlled using a collection of xml and vbs scripts, these are stored in the deploymentshare\scripts folder.
With a bit of copying and pasting between files I have been able to put the boxes for computer name and task sequence selection into a single pane, as we have used the deploymentshare rules settings to skip the other pages it means that we can pxe boot then simply enter a name and pick TS all in one page then walk away.
Apologies for this but this one is going to be a bit wordy
The files you will be modifying are
Deploywiz_Definition_ENU.xml
Deploywiz_SelectTS.xml
Deploywiz_ComputerName.xml
The files are named fairly well by Microsoft, the Definition file is the master file which guides you through the wizard, it calls the required files in turn. We will be making minor changes to this file but as always we should make a backup before we touch anything, just in case. The SelectTS file is the one which lists the task sequences available and allows us to choose one, the ComputerName file is self explanatory, however it also contains possibilities for you to enter domain join values, in our usage scenario we do not use these as the values are provided in the rules for the deploymentshare.
Open the ComputerName file and copy everything between the <body></body> tags, switch to the SelectTS file and paste all of this in just below the <body> tag and before the existing code, return to the ComputerName file and copy the <Initialization> and <Validation> section, again return to the SelectTS file and paste this in along with the existing values. Move to the top of the file and add the following as one line
<CustomScript>DeployWiz_ComputerName.vbs</CustomScript>
into the <global> section.
Change the <Pane id> values to something more appropriate such as
<Pane id="Name_Computer_and_SelectTaskSequence" title="Enter Name and pick a Task Sequence">
Save this file with your initials at the beginning and a more appropriate name, mine is called MHDeployWiz_Name_Computer_SelectTS.xml this will allow the deploymentshare files to be replaced in the future if an upgrade requires it but your files should remain in place.
You have now done the hard work.
Open the Definition file and edit the section
<Pane id="SelectTaskSequence" reference="DeployWiz_SelectTS.xml"> <Condition><![CDATA[UCASE(Property("SkipTaskSequence"))<>"YES" ]]></Condition> </Pane>
to contain our newly made xml file so it should read
<Pane id="SelectTaskSequence" reference="MHDeployWiz_Name_Computer_SelectTS.xml"> <Condition><![CDATA[UCASE(Property("SkipTaskSequence"))<>"YES" ]]></Condition> </Pane>
You can then remove completely the following section
<Pane id="ComputerName" reference="DeployWiz_ComputerName.xml"> <Condition><![CDATA[UCase(Property("SkipDomainMembership"))<>"YES" or UCase(Property("SkipComputerName"))<>"YES"]]></Condition> <Condition><![CDATA[Property("DeploymentType")<>"REPLACE" and Property("DeploymentType")<>"CUSTOM" and Property("DeploymentType") <> "StateRestore" ]]></Condition> </Pane>
If you do not remove this then you will have another screen (which we are trying to remove) asking for the computer name, however its value will have been taken from the previous screen.

Save your file and test your deployment.
I have attached my modified files at the end of this post so you can see some which I have working in my test environment, feel free to play with them for your own use.I have used these modified files to deploy XP, "7 and W8 Consumer Preview, I am sure that much more can be done with the xml files in MDT so there may be more posts to follow, but for now that’s it.
Good Luck


I'm interested. Thanks for the info. For one question. Who or what is panther in windows?
ReplyDeletePanther is the folder which contains the setup information such as log files and unattended config files.
DeleteMore information can be found here
http://support.microsoft.com/kb/927521