Been a while since I've posted, but this one I've wasted a day or two trying to resolve and couldn't find any information anywhere.
Issue: VMWare vSphere or Workstation accepting mouse input, but not keyboard input.
Cause: Windows update KB2973201 - A security update for tablet features, unnecessary for most users.
Workaround: Uninstall the update. Hide in windows updates to prevent reinstalling.
Fix: TBA
Tuesday, 15 July 2014


Thursday, 3 July 2014
Change Default Printer Settings from 2 sided to 1 sided on 10.9
Annoyingly when you add certain drivers to a Mac, the default may say 1-sided but the pages still print as 2-sided. This can cause much frustration and although you can create presets, there is no way to actually change the default through those settings. However by following these few steps you can change the default settings. Please bear in mind, this only changes the default on the computer you are working on. If you have a Mac Server where the printer sits, then run these steps on that and it should set it all as default:
Annoyingly again on 10.9, access to the CUPS page is blocked, it is almost like Apple don't want to change anything these days. To
enable it, open Terminal (Go to spotlight and search for it) and type
"sudo cupsctl WebInterface=yes" (without the quotation marks). You
will need to enter the admin password when prompted.

Open a browser and in the address bar enter “localhost:631”

With the CUPS web page open, select the Printers tab and the printer you want to edit. In this case I select the Konica.

Then on the drop down menu titled “Administration” , change to "Set Default Options".

This will show a new page with some new headings (links).

In this case select Finishing Options. Scroll down the list until you see Print type. Change it from 2 Sided to 1 Sided.

Then scroll down the page until you see the Set Default Options button.

Click on this button to save the change. You will then be prompted to authenticate to CUPS.


Enter the account name and password of the Mac user, it needs to be an admin account. And then press the Log In button. You should then get a confirmation.
Friday, 27 June 2014
DNS Cleanup - Setup Scavenging - Properly
Importance of DNS
DNS is arguably the most important aspect of any network.
Incorrect setup, errors and old records can significantly affect performance and since a lot of third party applications such as antiviruses, remote support use it, as well as all windows server roles and system center products it is fairly important.
If DNS fails, everything else will. Trust me, trust all IT Admins, when it goes down, brown trousers are a guarantee.
Multiple ISPs, I know for one Ja.net, do offer backup name servers and automatic fail-over, so in the event that your DNS does fail, at least you know you have an offsite copy somewhere. Janet DNS Services
Is there something wrong with mine?
Now if you work in a single establishment and have performed multiple migrations of your network, I can guarantee (since you are reading this) you probably looked at your DNS and realise.. wait there are machines in here which haven't existed for years.. why haven't they gone. Scavenging is set.
This also applies for new networks as well which have been going for a couple years or so. It doesn't take long for a network to get quite dirty.
You gotta love GUI...not. This is why we should all be on Core editions people! If you are a Doctor Who fan, you know the Doctor Lies, a GUI lies to.
Yes you have a tick box and yes you've specified the day to scavenge records, but have you also noticed that when you scavenge manually.. they still stay there.. now isn't that just weird.
Is there something wrong with your DNS, well no, because your network is working, but yes because it isn't working as well as it could be.
Lets Tidy Up.
Active Directory Domain Services
First and foremost since you are doing all this cleaning, it might be worth just re-looking at your Active Directory.
At my college, yes I have a accurate asset register, but there is that part of me thinking, is it possible that this random computer is still being used by someone. Why is it in AD if it isnt?
If unsure, disable it and wait for the phone to ring, enabling it takes all of 5 seconds to fix the issue. Cleaning up AD can make your life so much easier as when running through the DNS records you can then say, hand on heart, that machine shouldn't be in there, it doesn't exist anymore.
After a set period of time (48hours to 2 weeks), if you can say well no one has called and all staff full time and part time have been in since then, then you can delete it properly from Active Directory. I genuinely disabled about 40 machines when I first started here. How else am I going to find out? People are quick to report issues when they can't login, plus makes you feel in control, they need to be reminded of this. :)
DNS
Now you can say AD is up to date and accurate, lets start sorting out DNS.
You will need to perform the following actions on every DNS server in your organisation, don't listen to the myths of it replicating, thats Microsoft pretending that everything is perfect. When it comes to settings, just pretend nothing like that works and manually check. Sometimes it does replicate and i'm sure the settings do after X amount of time, but I haven't got time to sit with fingers crossed.
Saying that, there is a moment, where you just need to wait, some things cannot be rushed.. Trust me on this.
Regardless if you use RSAT or login to your server remotely/directly, you need to open DNS (shock)
Add in ALL your DNS Servers, so you can just do it all from one place.
Right click your first server and choose Set Aging/Scavenging for All Zones.

On the Menu, choose the tick box and set a time for your scavenging, best practice is 7 days. For a school I like 5. (I did this on a Monday, so now mine refreshes the weekend).

Press Ok.
Right click the server again and choose properties.
On the Advanced Tab, ensure "Enable automatic Scavenging of Stale Records" is ticked and you specify the identical number of days you specified above.
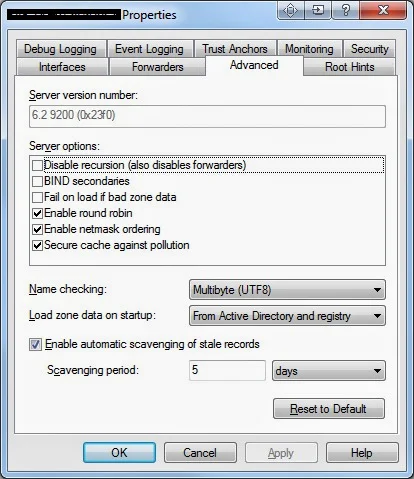


Set this to the same time as what you have done before.
*this is not best best practice and in a very large enterprise environment, you wouldn't set these times all the same (hence why it isn't set from the top level). In a school single forest, single site, hell even a double site, this is not going to cause any problems. University level, maybe you need to plan this out a bit more, but at that level frankly if your technicians and administrators have a bad DNS then what the hell are you doing.
Press Ok to the Aging and press ok to the properties menu.
If you have a second DNS Server then do all the process again for your second one.
If you have more than 2 DNS Servers however, do the complete opposite. Turn OFF DNS scavenging in every menu specified above. In this case it is best to have one server handling all the scavenging.
Command Line Stuff
Login to your primary DNS Server.
If you have two DNS Servers:
Go to CMD as Administrator
Type in DNSCmd . /ZoneResetScavengeServers [Domain] [DNSServerIP] [SecondDNSServerIP]
e.g. DNSCmd . /ZoneResetScavengeServers contoso.local 192.168.10.10 192.168.10.11
If you have more than two DNS Servers, ensure all servers, except your primary, have scavenging turned off and type in the same command minus the [SecondDNSServerIP]. So.
DNSCmd . /ZoneResetScavengeServers contoso.local 192.168.10.10
What will happen now
New scavenge servers:
Ptr = bunchofnumbers
MaxCount = 2
AddrCount = 2
server[0] => gobbledeegook, addr=192.168.10.10
server[1] => gobbledeegook, addr=192.168.10.11
Reset scavenging servers on zone [domain] successfully.
Command completed successfully.
You will notice that once you have typed in what you need to the list of scavenging servers is now setup successfully. You might have 2 in the list, or just 1 depending on your setup.
The waiting game begins.
Patience
This will take several weeks to finally sort itself out. The reason being is that machines that joined before you set this all up are setup on a different timestamps to what you specified as well as other things as well and other than manually deleting them, just hold fire and wait.
After a few weeks you'll begin to notice that your scavenging is actually working now. No odd devices are appearing in your DNS.
Roles such as WSUS will begin to actually clean itself up when you click clean, things like system center client deployments will work much faster. Antivirus logs become more accurate, server resolution is significantly quicker and the clients will begin to notice some speed improvements, though they won't ever say anything. Login times usually improve as well and you'll probably find that group policies that are set but haven't applied correctly start to apply oh and DFS begins to love you again.
I hope this blog has helped out a lot of people out there, I know my life became so much easier once I got the DNS stuff out the way. My DNS is neat, my AD is neat and there is no sign of old devices from previous migrations. Ready for the future.
Thanks for reading!
DNS is arguably the most important aspect of any network.
Incorrect setup, errors and old records can significantly affect performance and since a lot of third party applications such as antiviruses, remote support use it, as well as all windows server roles and system center products it is fairly important.
If DNS fails, everything else will. Trust me, trust all IT Admins, when it goes down, brown trousers are a guarantee.
Multiple ISPs, I know for one Ja.net, do offer backup name servers and automatic fail-over, so in the event that your DNS does fail, at least you know you have an offsite copy somewhere. Janet DNS Services
Is there something wrong with mine?
Now if you work in a single establishment and have performed multiple migrations of your network, I can guarantee (since you are reading this) you probably looked at your DNS and realise.. wait there are machines in here which haven't existed for years.. why haven't they gone. Scavenging is set.
This also applies for new networks as well which have been going for a couple years or so. It doesn't take long for a network to get quite dirty.
You gotta love GUI...not. This is why we should all be on Core editions people! If you are a Doctor Who fan, you know the Doctor Lies, a GUI lies to.
Yes you have a tick box and yes you've specified the day to scavenge records, but have you also noticed that when you scavenge manually.. they still stay there.. now isn't that just weird.
Is there something wrong with your DNS, well no, because your network is working, but yes because it isn't working as well as it could be.
Lets Tidy Up.
Active Directory Domain Services
First and foremost since you are doing all this cleaning, it might be worth just re-looking at your Active Directory.
At my college, yes I have a accurate asset register, but there is that part of me thinking, is it possible that this random computer is still being used by someone. Why is it in AD if it isnt?
If unsure, disable it and wait for the phone to ring, enabling it takes all of 5 seconds to fix the issue. Cleaning up AD can make your life so much easier as when running through the DNS records you can then say, hand on heart, that machine shouldn't be in there, it doesn't exist anymore.
After a set period of time (48hours to 2 weeks), if you can say well no one has called and all staff full time and part time have been in since then, then you can delete it properly from Active Directory. I genuinely disabled about 40 machines when I first started here. How else am I going to find out? People are quick to report issues when they can't login, plus makes you feel in control, they need to be reminded of this. :)
DNS
Now you can say AD is up to date and accurate, lets start sorting out DNS.
You will need to perform the following actions on every DNS server in your organisation, don't listen to the myths of it replicating, thats Microsoft pretending that everything is perfect. When it comes to settings, just pretend nothing like that works and manually check. Sometimes it does replicate and i'm sure the settings do after X amount of time, but I haven't got time to sit with fingers crossed.
Saying that, there is a moment, where you just need to wait, some things cannot be rushed.. Trust me on this.
Regardless if you use RSAT or login to your server remotely/directly, you need to open DNS (shock)
Add in ALL your DNS Servers, so you can just do it all from one place.
Right click your first server and choose Set Aging/Scavenging for All Zones.

On the Menu, choose the tick box and set a time for your scavenging, best practice is 7 days. For a school I like 5. (I did this on a Monday, so now mine refreshes the weekend).

Press Ok.
Right click the server again and choose properties.
On the Advanced Tab, ensure "Enable automatic Scavenging of Stale Records" is ticked and you specify the identical number of days you specified above.

Press Ok.
Right, open up forward lookup zones, choose your domain, right click Properties.

Choose the aging button on the General Tab.

Set this to the same time as what you have done before.
*this is not best best practice and in a very large enterprise environment, you wouldn't set these times all the same (hence why it isn't set from the top level). In a school single forest, single site, hell even a double site, this is not going to cause any problems. University level, maybe you need to plan this out a bit more, but at that level frankly if your technicians and administrators have a bad DNS then what the hell are you doing.
Press Ok to the Aging and press ok to the properties menu.
If you have a second DNS Server then do all the process again for your second one.
If you have more than 2 DNS Servers however, do the complete opposite. Turn OFF DNS scavenging in every menu specified above. In this case it is best to have one server handling all the scavenging.
Command Line Stuff
Login to your primary DNS Server.
If you have two DNS Servers:
Go to CMD as Administrator
Type in DNSCmd . /ZoneResetScavengeServers [Domain] [DNSServerIP] [SecondDNSServerIP]
e.g. DNSCmd . /ZoneResetScavengeServers contoso.local 192.168.10.10 192.168.10.11
If you have more than two DNS Servers, ensure all servers, except your primary, have scavenging turned off and type in the same command minus the [SecondDNSServerIP]. So.
DNSCmd . /ZoneResetScavengeServers contoso.local 192.168.10.10
What will happen now
New scavenge servers:
Ptr = bunchofnumbers
MaxCount = 2
AddrCount = 2
server[0] => gobbledeegook, addr=192.168.10.10
server[1] => gobbledeegook, addr=192.168.10.11
Reset scavenging servers on zone [domain] successfully.
Command completed successfully.
You will notice that once you have typed in what you need to the list of scavenging servers is now setup successfully. You might have 2 in the list, or just 1 depending on your setup.
The waiting game begins.
Patience
This will take several weeks to finally sort itself out. The reason being is that machines that joined before you set this all up are setup on a different timestamps to what you specified as well as other things as well and other than manually deleting them, just hold fire and wait.
After a few weeks you'll begin to notice that your scavenging is actually working now. No odd devices are appearing in your DNS.
Roles such as WSUS will begin to actually clean itself up when you click clean, things like system center client deployments will work much faster. Antivirus logs become more accurate, server resolution is significantly quicker and the clients will begin to notice some speed improvements, though they won't ever say anything. Login times usually improve as well and you'll probably find that group policies that are set but haven't applied correctly start to apply oh and DFS begins to love you again.
I hope this blog has helped out a lot of people out there, I know my life became so much easier once I got the DNS stuff out the way. My DNS is neat, my AD is neat and there is no sign of old devices from previous migrations. Ready for the future.
Thanks for reading!
Friday, 11 April 2014
Open File Security Warning - Complete Resolution
This is one of the most popular topics on the web, its absolutely crazy how many people have been involved in discussions about it.
Welcome to our version on Thoughts of Primary School Tech, ironically with me, a college tech (and manager I might add), my my we have moved one since we first starting blogging on here.
Lets sort the questions out once and for all and get some pictures involved. None of this, "just add it to gpo" generic responses, or "that is trusted zone, just add it there", nothing more annoying when someone posts up a solution in their own language and you have no clue how to solve the problem.
The Policies
First lets bring up a picture, we all understand pictures.

For those with visual difficulty, this picture shows a side by side comparison of the Server 2012 group policy which affects the 4 security zones found on the security tab in Explorer.
In Group Policy this is found in the following location:
Computer Configuration -> Policies -> Administrative Templates -> Windows Components -> Internet Explorer -> Internet Control Panel -> Security Page -> Site to Zone Assignment List.
On the Client machine the security page is found by going to:
In go to Tools (Alt+X), then go to Internet Settings. Choose the Security Tab.
Now even though we are playing within Internet explorer settings, you should know windows well enough to know that a window that shows your files is using the Explorer.exe process. Just because these settings live in internet explorer, doesn't mean they do not affect the settings within the rest of the operating system. This is a big reason to why removing internet explorer is almost impossible without breaking something else, it is part of the operating system and the settings affect the system as well.
Drive Mappings
Right a mapped drive defined by either a script or preferences is just putting a friendly look on what would would be an UNC path which non technical folk, bless them, would never understand.
The mapped R:\ drive for example, would actually be the location \\Servername\sharename\resources but we cannot expect our users to know this, so we just say it's the R:\ drive. Simple.
Now you can map this location in five potential (realistic) ways.


Within this policy you can specify the security zones for your intranet.
Values are:
1. Intranet Zone
2. Trusted Site Zone
3. Internet Zone
4. Restricted Zone
To prevent file security windows appearing when opening up a certain file type from a mapped drive, you must know how your mapped drive is mapped first. The setting you discovered by following this document will be the setting you need to deploy out.
So type in your setting e.g. *.domain.local in the Value name field and type in 1 in the value field.
Now remember that Validation error:
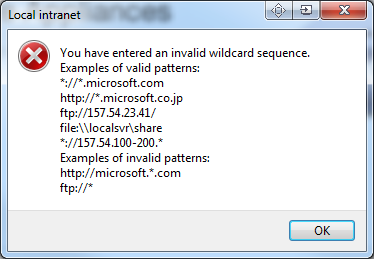
This will not happen if you make a mistake here, the server will accept it regardless of if it is right or not. This is bad and should not be done.
Gpupdate and RESTART your client machines once you have put in the setting and applied it in group policy.
Open up a client affected by the policy, go to the advanced menu in Internet explorer intranet settings and see if your policy has applied.
Try and open a .exe as a restricted user and by magic, your file security warnings now vanish as if they were never a problem. Such a pain in the backside, but all this work is worth it, especially if you use software that when updated server side runs .exes when loading up client side.
Known Errors
If you find other errors that relate to this, please tell us in comments, the longer the list the easier it is for those struggling to find this blog.
Error 1
Windows failed to apply the Internet Explorer Zonemapping settings. Internet Explorer Zonemapping settings might have its own log file. Please click on the "More information" link.
Cause
You've typed something in wrong in the Site-to-Zone Assignment policy that does not meet the requirements of the syntax.
Resolution
Computer Configuration -> Policies -> Administrative Templates -> Windows Components -> Internet Explorer -> Internet Control Panel -> Security Page -> Site to Zone Assignment
Stick to the recommended syntax sequence, below is an image showing examples of the correct sequences supported by Windows.
Welcome to our version on Thoughts of Primary School Tech, ironically with me, a college tech (and manager I might add), my my we have moved one since we first starting blogging on here.
Lets sort the questions out once and for all and get some pictures involved. None of this, "just add it to gpo" generic responses, or "that is trusted zone, just add it there", nothing more annoying when someone posts up a solution in their own language and you have no clue how to solve the problem.
The Policies
First lets bring up a picture, we all understand pictures.

For those with visual difficulty, this picture shows a side by side comparison of the Server 2012 group policy which affects the 4 security zones found on the security tab in Explorer.
In Group Policy this is found in the following location:
Computer Configuration -> Policies -> Administrative Templates -> Windows Components -> Internet Explorer -> Internet Control Panel -> Security Page -> Site to Zone Assignment List.
On the Client machine the security page is found by going to:
In go to Tools (Alt+X), then go to Internet Settings. Choose the Security Tab.
Now even though we are playing within Internet explorer settings, you should know windows well enough to know that a window that shows your files is using the Explorer.exe process. Just because these settings live in internet explorer, doesn't mean they do not affect the settings within the rest of the operating system. This is a big reason to why removing internet explorer is almost impossible without breaking something else, it is part of the operating system and the settings affect the system as well.
Drive Mappings
Right a mapped drive defined by either a script or preferences is just putting a friendly look on what would would be an UNC path which non technical folk, bless them, would never understand.
The mapped R:\ drive for example, would actually be the location \\Servername\sharename\resources but we cannot expect our users to know this, so we just say it's the R:\ drive. Simple.
Now you can map this location in five potential (realistic) ways.
- You map it based on the NETBIOS name of the server, so lets say our server is called File-SVR-01, so the map would look like \\File-SVR-01\Sharename\resources.
- You can map it based on the server's IP address so: \\192.168.10.4\Sharename\resources
- You can map it based on an alias of your server so: \\Files\Sharename\resources
- You can map it based off a DFS namespace so: \\domain.local\NS\Sharename\resources
- You can map it based off the full FQDN of the file server so: \\File-SVR-01.domain.local\Sharename\resources
There are probably plenty of others, especially we get SANS involved, but I feel for the majority of us, these five should be the most common ways.
Now I know that stuff like using NETBIOS or the FQDN are essentially the same, and yes in all intensive purposes you would be correct, but for this file security warning we suffer on a daily basis it can matter in which method you used. Consistency is important when mapping drives, if you use the FQDN, then you must use it for every share, do not cut corners here or you can get some unexpected results.
Fix the problem
Lets fix the problem on one machine first, prove the fix and just get rid of that open file security warning once and for all. I do not want you to start deploying out policies you might not have full understanding of because whats the point if you do not learn anything from it.
Get on a machine, login, ideally you need to be on an account that has permission to alter the internet explorer security settings, so domain administrator on a machine in a different OU unrestricted by policies. You need to have mapped drives however to test.
Find a .exe file in the mapped drive and attempt to use it. It should not run immediately and you get the famous:

Open Security File Warning
Notice that even as an administrator, this still appears.
Notice at the bottom the warning you receive, this is important.
"While files from the internet can be useful, this file type can potentially harm your computer. Only run software from publishers you trust"
This is the error we would like to see, as this entire topic is based on this particular one. The following two errors are different problems:
User Account Control Error

Digital Signature Error

Fix found here: Fix Digital Signature Security Warning
Now that you understand the differences between the three errors above, lets assume you have got the first error screen the one specifying it is a file from the internet and poses a security risk.
Now you know that the file is not from the internet and is from your local network, you know this because you know your mapped drive is a server location. So now you need to add your server to your intranet zone, not trusted zone, not restricted, not internet zone, your intranet zone.
This is important as there are a lot of people out there that are all like, stick it in your trusted zones, this can actually cause you more headache sometimes. The reason being is because in all server versions with the exception of 2008R2 and above, the trusted zone would of actually worked.
Weird right? I never tested this theory but apparently after endless searches and realization of the pattern, everyone who has this problem on 2008 or lower, resolved it, yet those that have 2008R2 or higher, said it doesn't, so I have to make that connection there. Might not be true, but I never said I was honest.
The reason being is that trusted sites does not turn off prompts, intranet does.
Before we even touch server side, lets make it work on one machine, then we know what to type in on the server, as the server does not have any validation of the information you type into it, meaning you might attempt to force incorrect keys onto your clients, which is not good and causes errors, these errors will be explained at the end of this post.
Go to: In IE -> Tools (Alt+X) -> Internet Settings -> Security Tab -> Local Intranet -> Sites -> Advanced
Type in *.domain.local (filling in domain.local with the full name of your domain).
If you do not type it in correctly, you will be presented with this error:

This error explains the syntax that can be put in this setting. If you do not meet the syntax requirements, it tells you about it. However, if you type the incorrect syntax on the sever, it will still accept it. This is why we do it on the client first, once we do it right here, we know exactly what to type on the server.
After you have typed in your wildcard domain, press ok and exit out of Internet explorer.
Now try to open your .exe you tried before and hopefully the security file type will vanish. You have successfully found the fix for the problem and can move to the Server Side Policies.
Continue Only if the security file prompt still appears, if it has vanished, go to the server side settings.
If it is still not working, then continue.
Now go back to the same advanced menu and remove the *.domain.local setting, since we know it does not work with just this, there is no point in it now.
Now the reason this wouldn't work is most likely because of the way you are mapping your drives, if your drives are not being mapped with a Netbios or FQDN name, then this would the reason for it. If you map using IP Addresses, then this is a common reason for the failure.
So this time in the advanced menu you must put the IP Addresses of your file server(s) and if you want the entire scope to treat the entire domain as intranet.
Remember the syntax and no /24 /23 subnets do not qualify.
The trick now is trial and error and requires you to make some decisions. I do not know your network and frankly would confused you if I started recommending some things. Try different combinations. The benefit however is that you know when you type something in, it is valid if it accepts it and is invalid if it doesn't, take advantage of this validation as the server does not give you this luxury.
Eventually you will find that it accepts something and as you test the .exe from the mapped location, bang, the .exe starts to run without the warning, at this point cheer! Remember the setting, the exact setting remember the syntax like it was your own name. Lets move to the server now.
IMPORTANT - Remember this setting, it is your fix and you need to type it in on the server.
Server Side
- Go to your primary domain controller
- Open up group policy management.
- Go to: Computer Configuration -> Policies -> Administrative Templates -> Windows Components -> Internet Explorer -> Internet Control Panel -> Security Page

- In here I have manually enabled the following policies:
- Intranet Sites: Include all local (intranet) sites not listed in other zones
- Intranet Sites: Include all sites that bypass the proxy server
- Intranet Sites: Include all network paths (UNCs)
- I have disabled
- Turn on automatic detection of intranet
These polices affect the settings in the Local Intranet window found by going to:
In IE -> Tools (Alt+X) -> Internet Settings -> Security Tab -> Local Intranet -> Sites

Applying the policies above will grey out and prevent change in this area.
Now Site to Zone Assignment policy (below) will affect everything within the Advanced menu from here, as you can see the "advanced" button above.
Site to Zone Assignment

This is the advanced menu where the settings will appear.
The setting will not appear if you do not specify the value of "1" to the value name (see next image)

Within this policy you can specify the security zones for your intranet.
Values are:
1. Intranet Zone
2. Trusted Site Zone
3. Internet Zone
4. Restricted Zone
To prevent file security windows appearing when opening up a certain file type from a mapped drive, you must know how your mapped drive is mapped first. The setting you discovered by following this document will be the setting you need to deploy out.
So type in your setting e.g. *.domain.local in the Value name field and type in 1 in the value field.
Now remember that Validation error:

This will not happen if you make a mistake here, the server will accept it regardless of if it is right or not. This is bad and should not be done.
Gpupdate and RESTART your client machines once you have put in the setting and applied it in group policy.
Open up a client affected by the policy, go to the advanced menu in Internet explorer intranet settings and see if your policy has applied.
Try and open a .exe as a restricted user and by magic, your file security warnings now vanish as if they were never a problem. Such a pain in the backside, but all this work is worth it, especially if you use software that when updated server side runs .exes when loading up client side.
Known Errors
If you find other errors that relate to this, please tell us in comments, the longer the list the easier it is for those struggling to find this blog.
Error 1
Windows failed to apply the Internet Explorer Zonemapping settings. Internet Explorer Zonemapping settings might have its own log file. Please click on the "More information" link.
Cause
You've typed something in wrong in the Site-to-Zone Assignment policy that does not meet the requirements of the syntax.
Resolution
Computer Configuration -> Policies -> Administrative Templates -> Windows Components -> Internet Explorer -> Internet Control Panel -> Security Page -> Site to Zone Assignment
Stick to the recommended syntax sequence, below is an image showing examples of the correct sequences supported by Windows.
Thursday, 10 April 2014
Dell Latitude Series - Freezing on Wake up
At my college we have a lot of Dell equipment, we deploy out our operating system via Microsoft Deployment Toolkit and because I am quite picky with my folder structures, I am able to ensure that all the drivers in MDT are kept up to date for each type of laptop.
Now in one occasion, a particular driver deployed caused multiple issues when it came to the laptop waking up from Sleep mode. These issues included:
Now in one occasion, a particular driver deployed caused multiple issues when it came to the laptop waking up from Sleep mode. These issues included:
- Not waking up at all, even when the power button is pressed or keys are pressed.
- Waking up but the screen is black
- Waking up but then the keyboard and mouse lock up giving the impression of a frozen laptop.
- Blue screening in rare occasions
Naturally we updated Chipset drivers, BIOS, Graphics.
We went through them one by one until we came across the cause and i'm confident others have had this issue, especially since it affects Windows 8.1 as well as Windows 7. Primarily the x64 versions, but looking across forums, it seems to be affecting some x86 as well.
Turns out, weirdly, it is caused by the O2 Micro Driver (for your SD Card).
To confirm it, simply disable the MMC/SD Driver in your Device Manager and see if Sleep modes begins to work better for you.
This is a tricky one to diagnose without time to figure it out, so I hope this helps some people out there.
Simply update to the latest driver, (or older) as long as its different to the version you have and it should resolve itself.
Credits
Upon realizing the problem I have stumbled across other forums that have found this to be the case and judging by the comments it seems to be helping others. It's always easy to find answers when you know the answer already.
Since this blog was made before my post, it is only fair to give credit to: Gnawgnu @ http://gnawgnu.blogspot.co.uk/
Good work mate.
Tuesday, 8 April 2014
Group Policy Redirection - Stops Working - [Fix]
Scenarios
You had a user which worked fine before now redirection has stopped working.
You are convinced it is not permissions as it has worked before.
You deleted a local version of the profile due to corruption and redirection no longer works
You deleted the network version of the profile due to corruption and redirection no longer works.
You deleted the profile from the machine incorrectly, causing a corruption and temporary profile issues.
You have wiped the profile from the local machine completely, yet still folder redirection does not work.
You have deleted all temporary files.
You have deleted the temporary files from the disk usage are under manage offline files.
There are errors stating that redirection failed, error codes include:
Event ID 502: Failed to Redirect because directory is offline.
Event ID 1085: Windows failed to apply folder redirection settings.
Stuff that can happen
The user logs in but with a temporary profile.
The user logs in successfully and all other preferences applied, but on the server none of the redirected folders have been created in your specified location. Instead they still remain in the profile, which for all intensive purposes seems to of built fine.
The user logs in, the profile is made but the Music, Video and Pictures folders have not made themselves.
The Pictures, Video and Music folders have made themselves but the other profile redirections have not.
Only some redirected folders are made.
New redirected folders I have applied make themselves fine.
I know deep down on any other machine this will work fine, with the exception of this batch/few/one.
The Fix
This comes from a selection of sources, but if you have found this post then you don't need to spend the hour or two bouncing back from the same old fixes that do not seem to work.
Now bare with me, you'll be like, "i've done this", yeh, I know you have, but it can be a combination of incorrect settings on the client, so if we do all these fixes, in the correct order, it won't matter what scenario you have, it will hopefully fix it all.
The only thing I ask, is that if you never had redirection working to begin with, then this is not a fix or guide on how to set them up, I would expect you to know at least the basics of folder redirection. This is a fix when you know that it is setup and it will work correctly and you are certain it is a client side issue.
1. Login the machine with an administrative user.
2. Go to start menu, right click Computer and choose Properties.
3. Choose Advanced System Settings
4. Choose Settings under User Profile
5. Find your problem profile, highlight it and delete.
6. Don't worry about errors or crap you get here.
7. Apply all, get out of this menu and go to start run and choose Regedit
8. Navigate to HKEY_LOCAL_MACHINE\Software\Microsoft\Windows NT\CurrentVersion\ProfileList
9. Find the key that is related to your problem profile, look in the keys on the right to find it.
10. Take a note of the end number of the key and delete the key.
11. Now go to HKEY_LOCAL_MACHINE\Software\Microsoft\Windows NT\CurrentVersion\ProfileGuid
12. Delete the key that references your SID which you just deleted. (hence why I asked you to note the last few numbers), go through each key and find that SID, delete that entire key.
13. Go to: HKEY_LOCAL_MACHINE\SYSTEM\CurrentControlSet\Services\Csc\Parameters
14. If parameters does not exist, create it.
15. Now in the Parameters node create a new registry value with the name FormatDatabase of typeREG_DWORD (i.e DWord 32-bit value)
16. Set the data in this new registry value to 1. (THANKS TO http://offlinefiles.blogspot.co.uk) for this)
17. Close the regedit editor
18. On your server, delete the roaming profile if there is one.
19. On the server, go to run and type gpupdate /force, (why not. eh, we got this far).
19. On your client, go to run and type Gpupdate /force
20. Clear the C:\Windows\Temp Folder
21. Restart your client machine
22. Wait for a connection, ideally use a network cable and for god sake if you just plugged it in, turn the wireless off for 5 seconds then turn it back on to ensure it does use the wire. Don't be a rookie.
23. Login as the troublesome user.
23. Say Thank you if it works, I appreciate it!
Now if this actually has not worked, then there must be a setting somewhere on your server. You have essentially made that client machine complete forget about a certain user. It was as if it was freshly imaged, a true first login.
Good luck!
You had a user which worked fine before now redirection has stopped working.
You are convinced it is not permissions as it has worked before.
You deleted a local version of the profile due to corruption and redirection no longer works
You deleted the network version of the profile due to corruption and redirection no longer works.
You deleted the profile from the machine incorrectly, causing a corruption and temporary profile issues.
You have wiped the profile from the local machine completely, yet still folder redirection does not work.
You have deleted all temporary files.
You have deleted the temporary files from the disk usage are under manage offline files.
There are errors stating that redirection failed, error codes include:
Event ID 502: Failed to Redirect because directory is offline.
Event ID 1085: Windows failed to apply folder redirection settings.
Stuff that can happen
The user logs in but with a temporary profile.
The user logs in successfully and all other preferences applied, but on the server none of the redirected folders have been created in your specified location. Instead they still remain in the profile, which for all intensive purposes seems to of built fine.
The user logs in, the profile is made but the Music, Video and Pictures folders have not made themselves.
The Pictures, Video and Music folders have made themselves but the other profile redirections have not.
Only some redirected folders are made.
New redirected folders I have applied make themselves fine.
I know deep down on any other machine this will work fine, with the exception of this batch/few/one.
The Fix
This comes from a selection of sources, but if you have found this post then you don't need to spend the hour or two bouncing back from the same old fixes that do not seem to work.
Now bare with me, you'll be like, "i've done this", yeh, I know you have, but it can be a combination of incorrect settings on the client, so if we do all these fixes, in the correct order, it won't matter what scenario you have, it will hopefully fix it all.
The only thing I ask, is that if you never had redirection working to begin with, then this is not a fix or guide on how to set them up, I would expect you to know at least the basics of folder redirection. This is a fix when you know that it is setup and it will work correctly and you are certain it is a client side issue.
1. Login the machine with an administrative user.
2. Go to start menu, right click Computer and choose Properties.
3. Choose Advanced System Settings
4. Choose Settings under User Profile
5. Find your problem profile, highlight it and delete.
6. Don't worry about errors or crap you get here.
7. Apply all, get out of this menu and go to start run and choose Regedit
8. Navigate to HKEY_LOCAL_MACHINE\Software\Microsoft\Windows NT\CurrentVersion\ProfileList
9. Find the key that is related to your problem profile, look in the keys on the right to find it.
10. Take a note of the end number of the key and delete the key.
11. Now go to HKEY_LOCAL_MACHINE\Software\Microsoft\Windows NT\CurrentVersion\ProfileGuid
12. Delete the key that references your SID which you just deleted. (hence why I asked you to note the last few numbers), go through each key and find that SID, delete that entire key.
13. Go to: HKEY_LOCAL_MACHINE\SYSTEM\CurrentControlSet\Services\Csc\Parameters
14. If parameters does not exist, create it.
15. Now in the Parameters node create a new registry value with the name FormatDatabase of typeREG_DWORD (i.e DWord 32-bit value)
16. Set the data in this new registry value to 1. (THANKS TO http://offlinefiles.blogspot.co.uk) for this)
17. Close the regedit editor
18. On your server, delete the roaming profile if there is one.
19. On the server, go to run and type gpupdate /force, (why not. eh, we got this far).
19. On your client, go to run and type Gpupdate /force
20. Clear the C:\Windows\Temp Folder
21. Restart your client machine
22. Wait for a connection, ideally use a network cable and for god sake if you just plugged it in, turn the wireless off for 5 seconds then turn it back on to ensure it does use the wire. Don't be a rookie.
23. Login as the troublesome user.
23. Say Thank you if it works, I appreciate it!
Now if this actually has not worked, then there must be a setting somewhere on your server. You have essentially made that client machine complete forget about a certain user. It was as if it was freshly imaged, a true first login.
Good luck!
Thursday, 13 February 2014
"Documents.library-ms" is no longer working.
You may get a user complaining that when they open Windows Explorer they get a message stating "Documents.library-ms" is no longer working. This library can be safely deleted from your computer.
This appears to be a corruption to one of the default library folders used to collate folder locations together in Windows 7 and 8. Happily it is easily fixed.
Open Windows Explorer, Right click on the Library in question, right click on Libraries and select restore default libraries.
You should find that the library has been repaired and you are up and running again.
Subscribe to:
Posts (Atom)